So how does IR photography work? by Matthew Stuart Piper

The How!
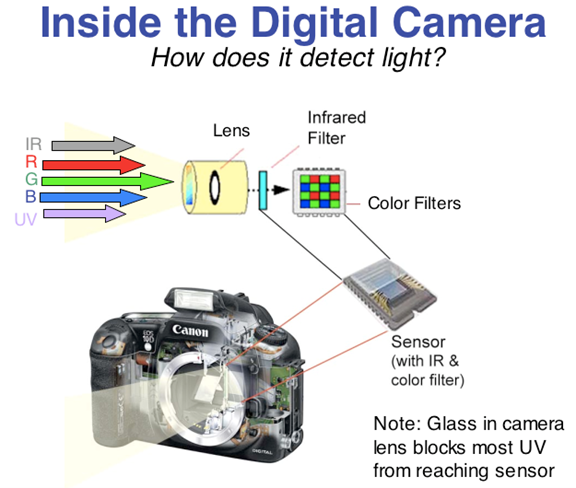
Every standard digital camera comes with an internal IR blocker (i.e., IR cut-off filter) to guarantee accurate color capture of the visible light spectrum (figure 1). So there are two basic options for shooting infrared: (1) remove the internal IR blocker or (2) put an external infrared filter on a normal, unmodified camera.
Option (2) is the simplest and least expensive, and there are a number of good IR filters out there. I recommend the Hoya R72, the Cokin 89b or any of the much larger range of IR filters sold by Kolarivision.
So, what can you expect with a basic IR filter? Fun and surprises! If you haven’t tried IR, this is a perfect way to dive right in! As mentioned above, shooting midday isn’t a problem with this method since you’ll get more IR effect and you need more light anyway. Why is that? Since IR filters like only pass a little bit of visible light plus IR light through the lens, and the internal filter blocks most of the IR light, there are two important consequences: (i) you’ll have to focus first and then apply the filter, and (ii) it takes a long time to get a properly exposed IR photograph. But that means an inexpensive filter and a standard tripod (or stabilizing equivalent) are all you need to start shooting IR! One of the interesting features with this method is that the long exposures you’ll need allow motion blur, which can add a lot of drama to your images (see “Lifespan” below).
There’s a trade-off, however. If that motion occurs in the subject of your photograph (e.g., trees, leaves, person, etc.), then it might be an unwanted feature (depending on your artistic goals, of course). So how would you fix that?
Well, if you want to be able to safely handhold your camera while still taking sharp IR photographs, option (1), where the IR blocker is removed from your camera, is the answer. Since a converted camera let’s in infrared light, the sensor is exposed quite quickly and it becomes possible to properly expose for IR radiation at high shutter speeds – those which allow you to get crisp images without motion blur.
An additional advantage of option (1) is that some of the problems unconverted cameras have focusing IR light are solved. Since IR light is longer wavelength, it focuses differently than visible light; on an unconverted camera, this can be a problem. But without an IR blocker you can focus IR light without problem via the live view mode. This all might sound great; so what’s the catch? Well, converting a camera can be somewhat expensive. There are lots of options for camera conversions, but I’d recommend Kolarivision. They’ve been a great sponsor for me, and please tell them I sent you!
So what is my advice for the curious? Begin with IR filter and start experimenting with your normal camera. If you’re enjoying the effects, then a camera conversion may be for you.
I hope you enjoyed this brief introduction to the “Why and How of Starting Digital Infrared Photography.” Please feel free to contact me with questions or comments! If you like the small sample of my infrared artwork above, please visit my website at www.matthewstuartpiper.com and my Instagram @matthew_stuart_piper for more.
Till next time – all the best!
Matthew Stuart Piper
BOMH Thanks these supporting agencies
